
Configuration of Geb automation environment using Spock, Groovy and IntelliJ for Dummies
By Alex Chaves – GlobalNow IT QA Manager
Introduction:
Selenium by far is one of most widely used tools to automate regression testing and other functional testing requirements; due to its perceived cost (it is open source) and inherent flexibility. To deploy an effective Selenium automation project, an intermediate or higher level of programming skill for a language such as JAVA is required to build and maintain the project over time.
Geb (http://www.gebish.org/) is a browser automation solution that works as an additional layer with the selenium web drivers in order to provide a more user friendly solution than stand-alone Selenium. This is very handy for QA engineers that may not have advanced programming skills. For instance, Java is often used to create Selenium scripts, and even though Java is very powerful, it requires a good working knowledge of the Java language to develop and maintain Selenium in this fashion. GEB can avoid the use of JAVA, allowing you to use Groovy – a simpler scripting language.
By using Geb/Groovy, and avoiding a language such as JAVA, the cost of maintaining the automation solution should decrease, plus responsiveness and delivery velocity may also increase due to the simplicity of Groovy.
Below is a step by step procedure that you should follow in order to enable the Geb automation environment. Although there are some references on the internet where you can find explanations of various components of the configuration, I was unable to find a site that clearly explained all the required steps that will enable your GEB automation framework.
- Download the IntelliJ IDE, it’s ok if it’s the community edition, it will work just fine https://www.jetbrains.com/idea/#chooseYourEdition. You will need to have a java JDK in order to configure it. (http://www.oracle.com/technetwork/es/java/javase/downloads/index.html).
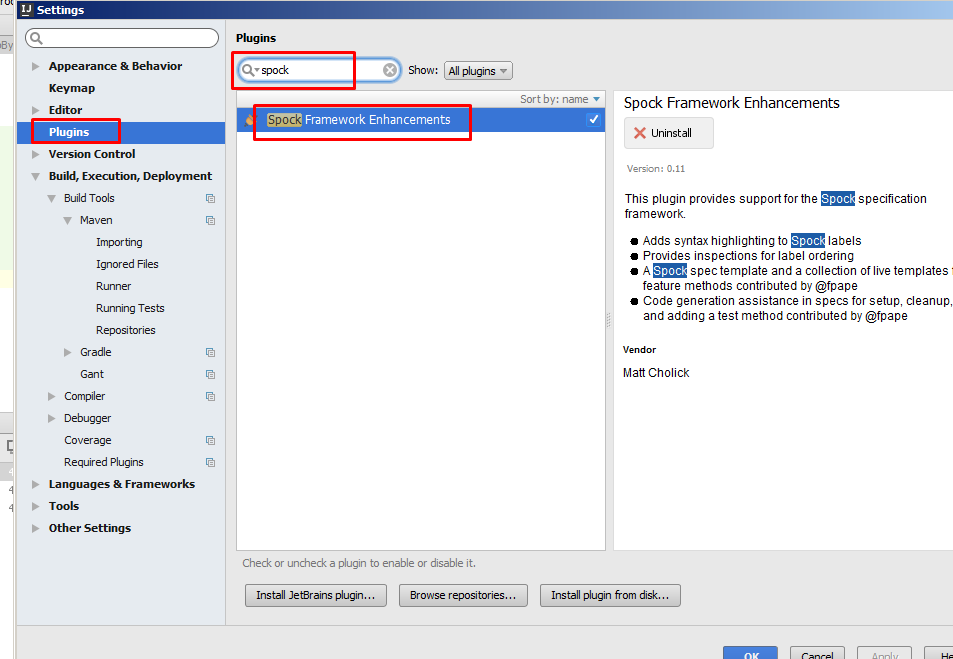
- Install the Spock plugin, Click on File-> Settings-> Plugins, search for Spock and install “Spock Framework Enhacements”, restart intelliJ.
3. Using intelliJ create a new Project, select the just download SDK version and Groovy as project type.

4. Click next, select a project name and click Finish button.
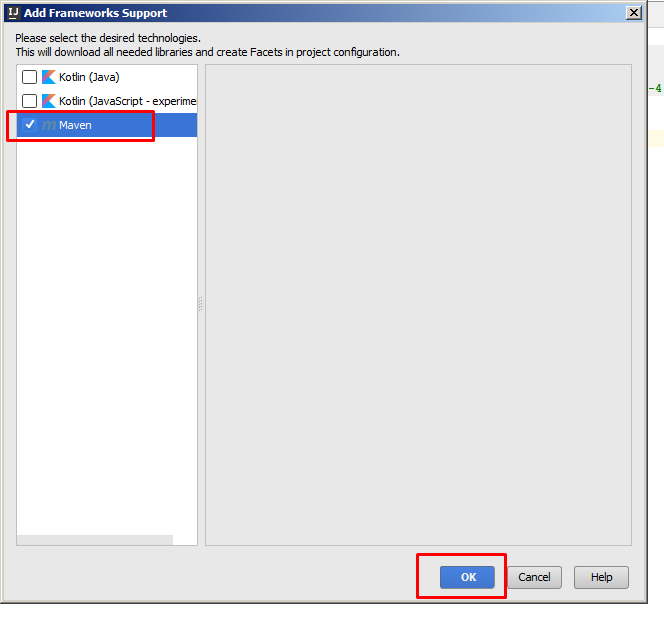
5. Right click over project name and select option “Add Framework support”
6. Select Maven and click Ok.
7. It is going to create a new pom.xml file under project structure.
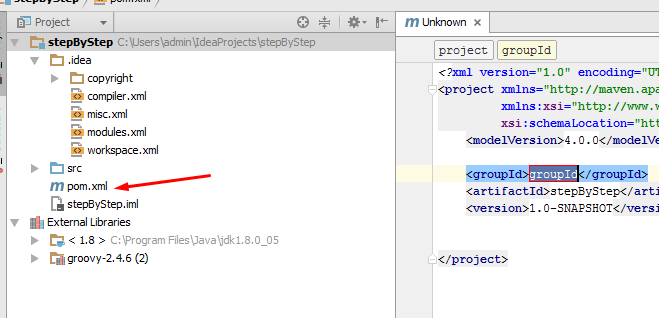
8. Edit it and add the following dependencies, make sure that you are using the latest version for each of the artifacts, when you use them you can check the versions here http://mvnrepository.com/
<dependencies>
<dependency>
<groupId>org.codehaus.groovy</groupId>
<artifactId>groovy-all</artifactId>
<version>2.4.6</version>
</dependency>
<dependency>
<groupId>org.gebish</groupId>
<artifactId>geb-spock</artifactId>
<version>0.13.1</version>
</dependency>
<dependency>
<groupId>org.spockframework</groupId>
<artifactId>spock-core</artifactId>
<version>1.0-groovy-2.4</version>
</dependency>
<!– Selenium –>
<dependency>
<groupId>org.seleniumhq.selenium</groupId>
<artifactId>selenium-support</artifactId>
<version>2.53.0</version>
</dependency>
<dependency>
<groupId>org.seleniumhq.selenium</groupId>
<artifactId>selenium-server</artifactId>
<version>2.53.0</version>
</dependency>
<dependency>
<groupId>org.seleniumhq.selenium</groupId>
<artifactId>selenium-firefox-driver</artifactId>
<version>2.53.0</version>
</dependency>
<dependency>
<groupId>org.seleniumhq.selenium</groupId>
<artifactId>selenium-chrome-driver</artifactId>
<version>2.53.0</version>
</dependency>
<dependency>
<groupId>org.seleniumhq.selenium</groupId>
<artifactId>selenium-ie-driver</artifactId>
<version>2.53.0</version>
</dependency>
<dependency>
<groupId>org.seleniumhq.selenium</groupId>
<artifactId>selenium-safari-driver</artifactId>
<version>2.53.0</version>
</dependency>
<dependency>
<groupId>org.seleniumhq.selenium</groupId>
<artifactId>selenium-htmlunit-driver</artifactId>
<version>2.52.0</version>
</dependency>
</dependencies>
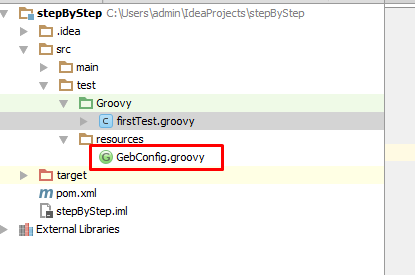
9. Create a GebConfig.groovy file, it must be located under /src/test/resources/GebConfig.groovy. Geb is going to detect this location by default and use the configuration. In that place you can define the baseURL, and browser.
10. For our example we are going to use the domain https://www.globalnowit.com/roi-calculator/ and the configuration file will look like this one:
import org.openqa.selenium.firefox.FirefoxDriver
driver = { new FirefoxDriver() }
baseUrl = “https://www.globalnowit.com/roi-calculator/”
reportsDir = new File(“target/geb-reports”)
reportOnTestFailureOnly = true
11. Notice that we have defined Firefox as our webdriver, you are capable to set IE, Chrome, HtmlUnit or Safari as well.
12. We are going to automate the following form
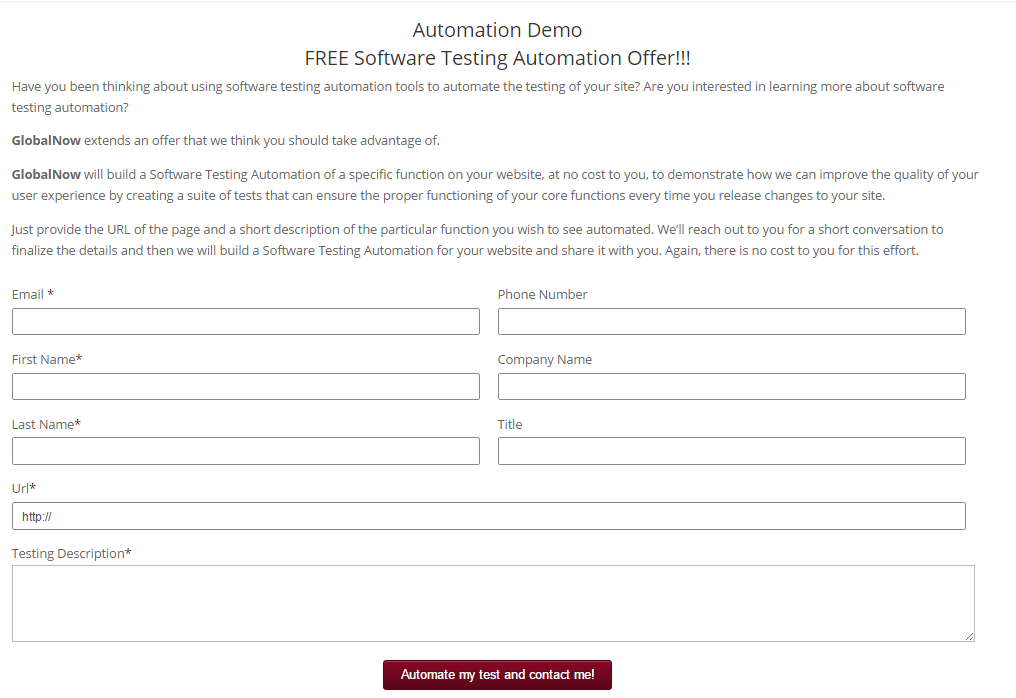
13. For that we need to create a page object that will contain all the fields. We are going to define the page Contact for that purpose.
class Contact extends Page
{
static url = “/automation-demo/”
static at = { title == “Automation Demo | Global IT – Software Services” }
static content = {
heading { $(“h1”).text() }
firstNameField { $(‘input’, name: ‘firstName’) }
lastNameField { $(‘input’, name: ‘lastName’) }
emailField { $(‘input’, name: ’email’) }
companyField { $(‘input’, name: ‘companyName’) }
phoneNumberField { $(‘input’, name: ‘phoneNumber’) }
titleField { $(‘input’, name: ‘title’) }
urlField { $(‘input’, name: ‘url’) }
descriptionField { $(‘textarea’, name: ‘Automation_Demo_Description’) }
submitButton(to: ResultPage) { $(“button[type=submit]”) }
}
}
14. We also will have a page for the result
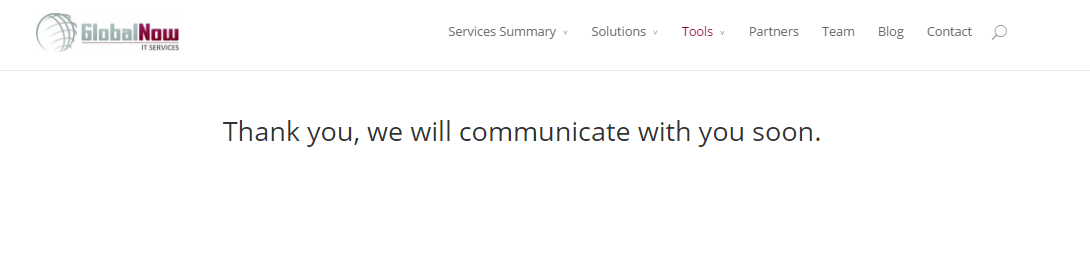
15. For this page we only have a heading as part of the definition, it will be the only element that we are going to validate.
class ResultPage extends Page {
static at = { heading.text() == “Thank you, we will communicate with you soon.” }
static content = {
heading { $(“h1”) }
}
}
16. Finally the script that will be used to populate all the required information and validate that it was executed successfully.
class ContactIT extends GebReportingSpec {
def “Enter all contact info successfully”() {
given: “I’m at the sign up form”
def contactPage = to new Contact()
when: “I fill it out as a valid user”
contactPage.emailField = “geb@test.com”
contactPage.firstNameField = “firstname”
contactPage.lastNameField = “lastname”
contactPage.companyField = “globalnowIT”
contactPage.urlField = “http://www.globalnowIT.com”
contactPage.titleField = “Mr”
contactPage.phoneNumberField = “1234567890”
contactPage.descriptionField = “I have a question?”
contactPage.submitButton.click()
then: “I’m at the result page ”
at ResultsPage
}
}
17. We use “def” in order to set a clear description of the intention of the test. “Given” statement will define the prerequisites of the test for example where is going to start the execution, here we have defined anew instance of the Page contactPage. “When” statement is used to define the actions of the test case, in our case we are using the instance created previously and we have defined all the values that each field will have. “Then” statement is used to validate the status of the application after execute all the defined steps, in our case we are checking if the H1 is being displayed correctly.
18. After those steps you will be able to run the test Go to Run in the menu and select the option “Run All”

 SIgn up